


This guide is an earlier version of the IAMMETER Home Assistant integration.
👉 For the latest and more complete documentation, please visit:
https://www.iammeter.com/docs/home-assistant
Integrating IAMMETER Wi-Fi energy meters with Home Assistant enables real-time monitoring of household or solar PV systems. This guide focuses on the Core Integration, the simplest and officially supported method to connect IAMMETER meters to Home Assistant.
IAMMETER meters also support other communication protocols such as Modbus/TCP, MQTT, and HTTP API, giving you full flexibility to integrate with smart home or industrial systems.
🔹 For a full comparison of all integration methods, see Advanced Integrations Overview.
Home Assistant is a leading open-source platform for smart home automation (official site). By integrating IAMMETER meters, you can easily monitor power usage, visualize solar generation, and automate devices based on energy data.
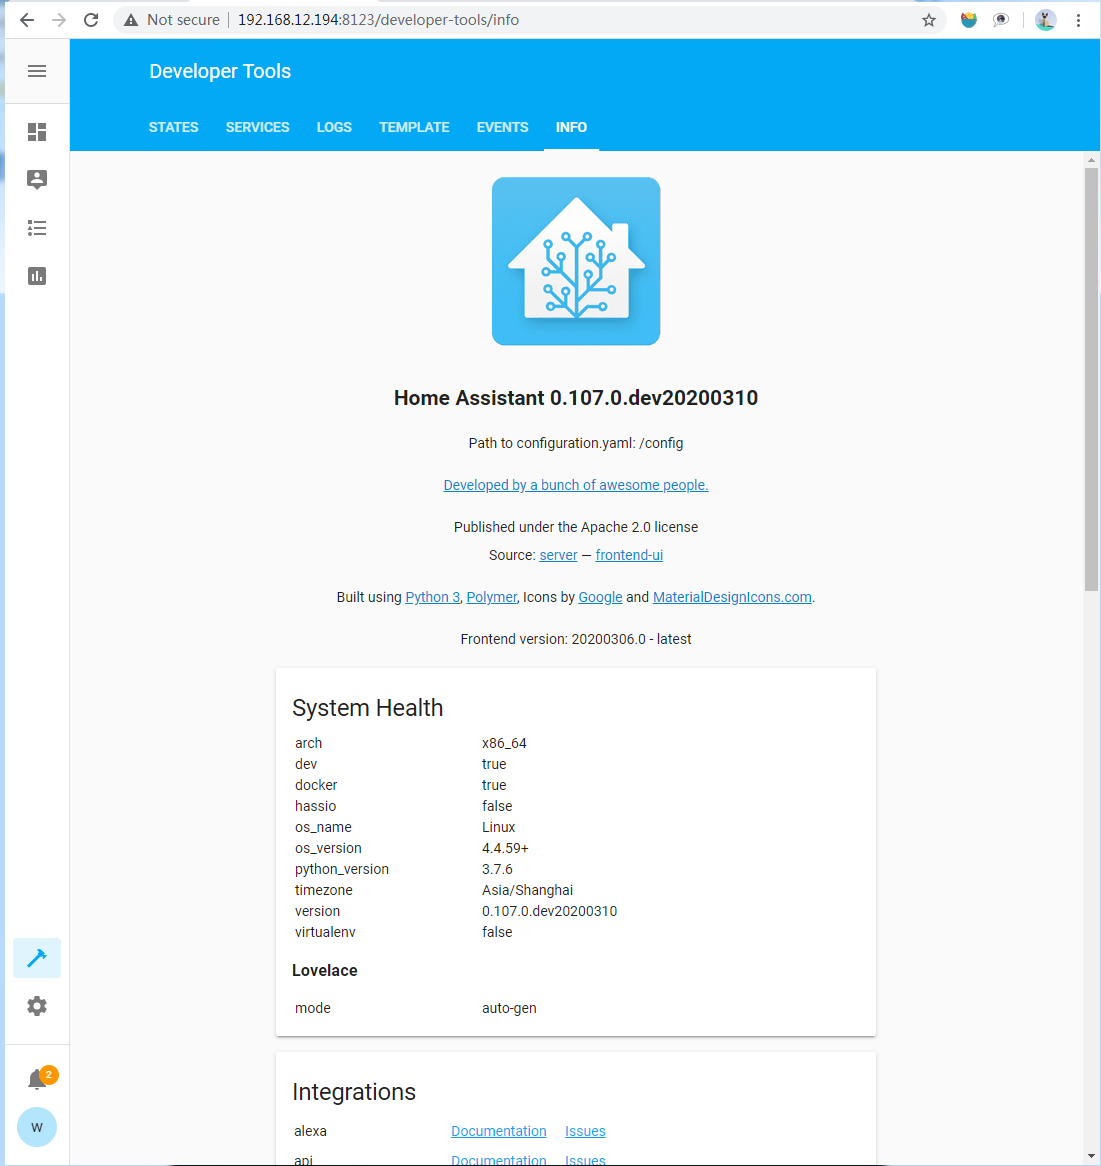
Download and install the latest version of Home Assistant (version 0.107.0.dev20200310 or later).
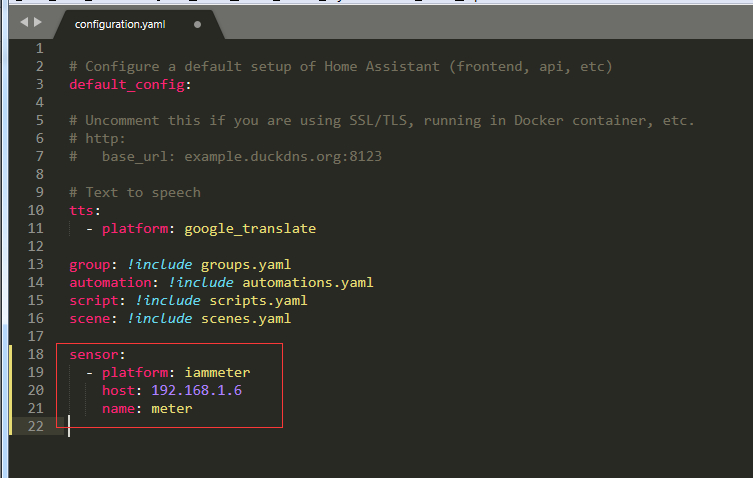
Edit your configuration.yaml file and add the IAMMETER integration:
sensor:
  - platform: iammeter
    host: 192.168.1.6
    name: meter
💡 Tip: Double-click the meter icon from the IAMMETER Wi-Fi Tool or scan your LAN to find the local IP address.
After saving the configuration, restart Home Assistant. Once restarted, IAMMETER sensor entities will automatically appear in your entity list.
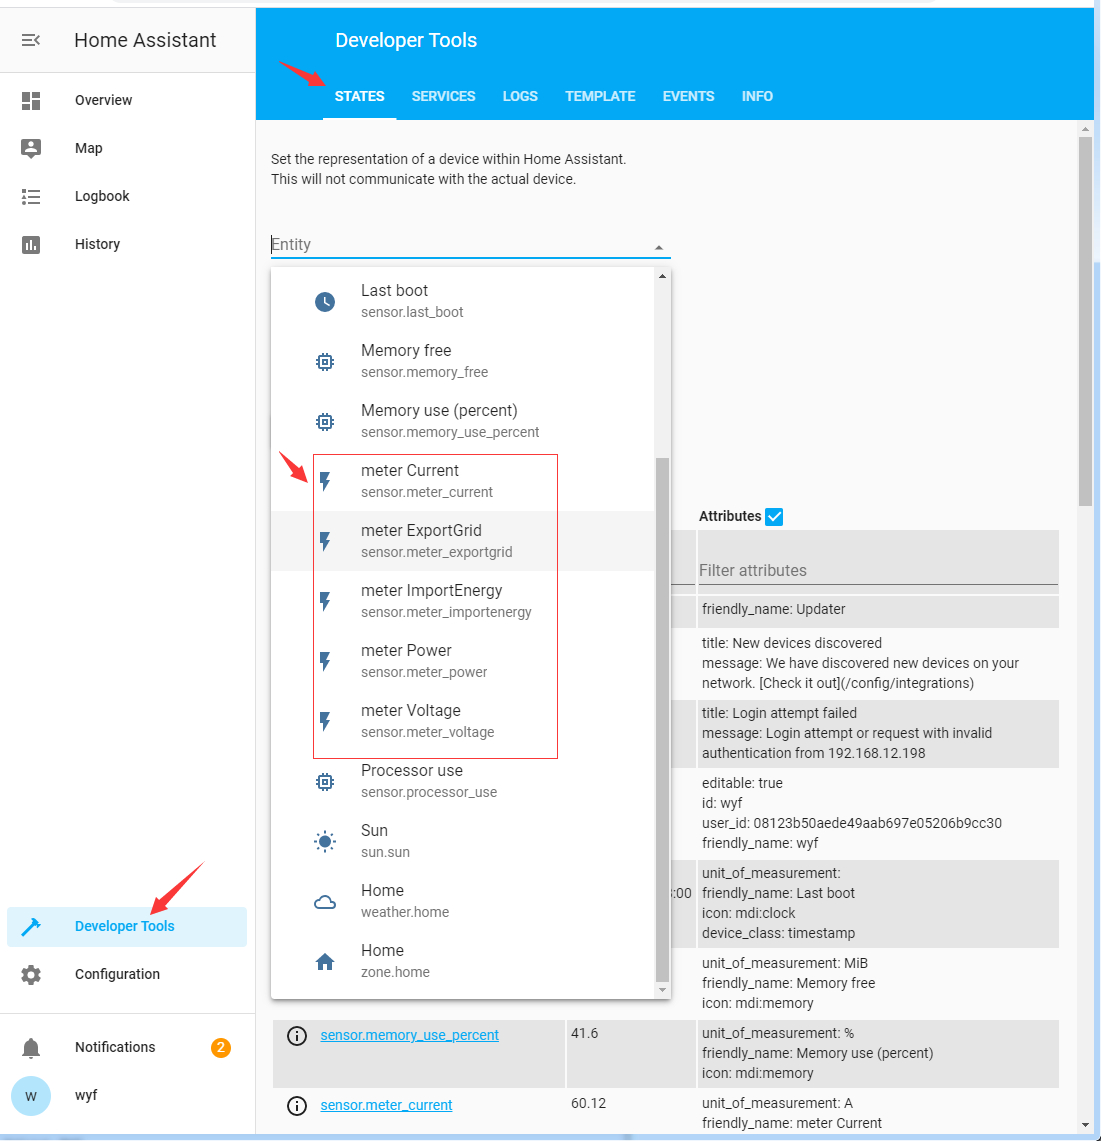
| Entity | Unit | Description |
|---|---|---|
wem3080_voltage |
V | Voltage |
wem3080_current |
A | Current |
wem3080_power |
W | Active Power |
wem3080_importenergy |
kWh | Imported Energy (from grid) |
wem3080_exportgrid |
kWh | Exported Energy (to grid) |
All IAMMETER three-phase Wi-Fi energy meters provide comprehensive measurements for each phase (A / B / C), including:
These models — WEM3080T, WEM3050T, and WEM3046T — are ideal for three-phase solar PV monitoring, industrial energy management, and split-phase residential systems.
They share the same communication interfaces (HTTP, Modbus/TCP, MQTT) and can be seamlessly integrated into Home Assistant using any of the integration methods described in this guide.
IAMMETER Wiring & Installation Guide
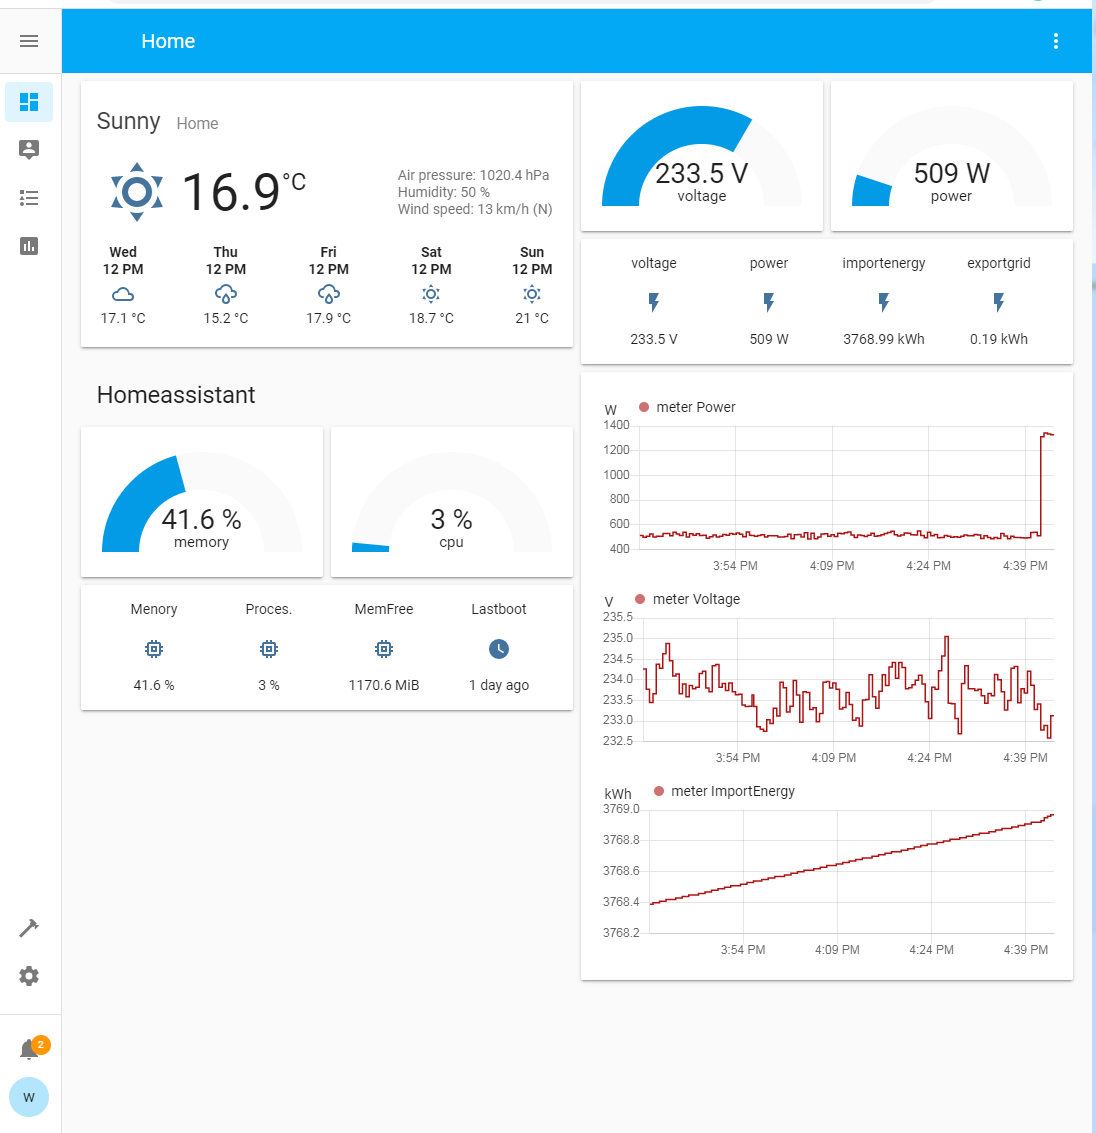
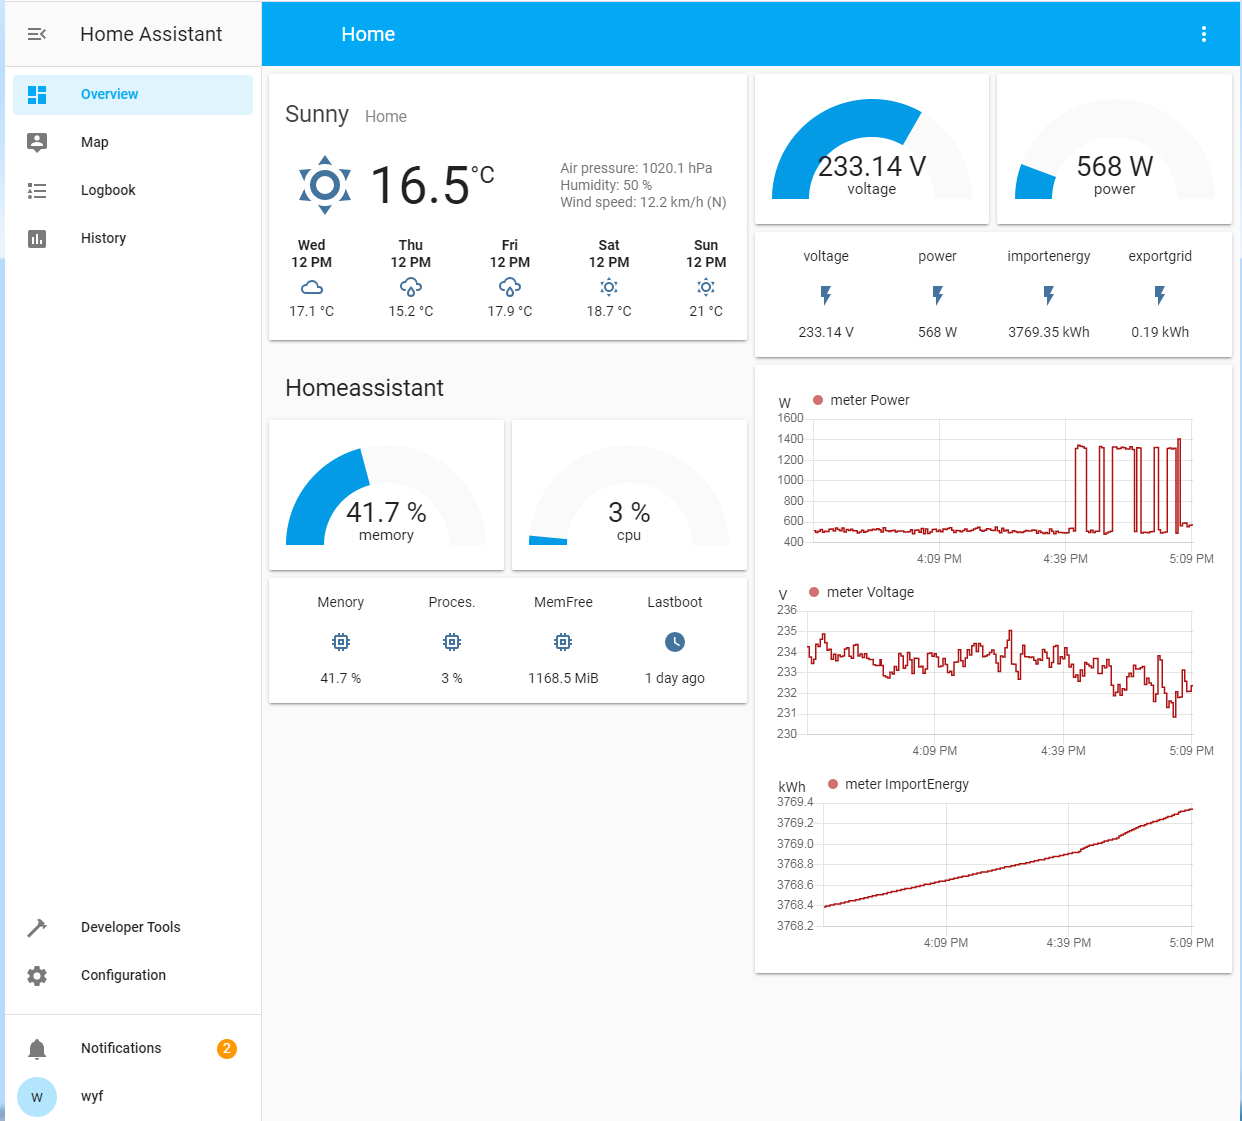
You can easily visualize your IAMMETER data with Home Assistant’s Lovelace UI.
Example card configuration:
cards:
  - cards:
      - entity: sensor.meter_voltage
        max: 300
        min: 100
        name: Voltage
        type: gauge
      - entity: sensor.meter_power
        max: 5000
        min: 0
        name: Power
        type: gauge
    type: horizontal-stack
  - entities:
      - entity: sensor.meter_voltage
      - entity: sensor.meter_power
      - entity: sensor.meter_importenergy
      - entity: sensor.meter_exportgrid
    type: glance
  - entities:
      - entity: sensor.meter_power
      - entity: sensor.meter_voltage
      - entity: sensor.meter_importenergy
    hours_to_show: 24
    type: history-graph
With IAMMETER integrated into Home Assistant, you can:
Example Use Cases:
You can also combine IAMMETER with the WPC3700 Wi-Fi Power Controller to dynamically control resistive loads (like water heaters) based on solar export power.
IAMMETER provides several integration options beyond the Core method. Each offers unique advantages for specific use cases.
| Method | Interface | Refresh Rate | Description |
|---|---|---|---|
| Core Integration | HTTP | ~1 min | Simple setup (this guide) |
| Modbus/TCP Sensor | Modbus/TCP | 1 s | Best for real-time control |
| MQTT Sensor | MQTT | 12 s | Flexible and cloud-free |
| HACS (Custom Integration) | HTTP/Modbus | 1 s–1 min | Extended Home Assistant features |
| MQTT Discovery (New, FW ≥ i.76.058.8) | MQTT | 6 s | Auto device discovery, easy setup |
📘 Learn more: Full Comparison of Home Assistant Integrations
IAMMETER energy meters also integrate with:
Q1. The IAMMETER sensor does not appear after restart.
→ Check your meter’s local IP address and ensure it matches the host: value in the YAML file.
Q2. Entities show “Unavailable” in Home Assistant. → Make sure the IAMMETER device is reachable in your LAN. Try pinging its IP address.
Q3. Can I use IAMMETER Cloud and Home Assistant simultaneously? → Yes. All integration methods (Core, Modbus/TCP, MQTT) can work alongside IAMMETER Cloud.
Q4. How often does the Core Integration refresh data? → Approximately every 60 seconds. For faster updates, use the Modbus/TCP integration.
Q5. Does IAMMETER support MQTT Discovery? → Yes. Starting from firmware i.76.058.8 (Jan 2025), MQTT Discovery is fully supported.
iammeter)Updated: October 2025 Author: IAMMETER R&D Team Website: https://www.iammeter.com

Three Phase Wi-Fi Energy Meter (WEM3080T)

Single Phase Wi-Fi Energy Meter (WEM3080)
")
Three Phase Wi-Fi Energy Meter (WEM3046T)
")
Three Phase Wi-Fi Energy Meter (WEM3050T)